Bioinformatics pipeline example from the bottom up
This tutorial is aimed at scientists and bioinformaticians who know how to work the command line and have heard about pipelines before but feel lost in the jungle of tools like Docker, Nextflow, Airflow, Reflow, Snakemake, etc.
This tutorial is aimed at scientists and bioinformaticians who know how to work the command line and have heard about pipelines before but feel lost in the jungle of tools like Docker, Nextflow, Airflow, Reflow, Snakemake, etc.
In this post, we're gonna strip away some of the complexity and take a simple bioinformatics workflow, and build a pipeline from the bottom up. The goal is to understand the pattern of how to take some scripts written in a language like bash or python and turn them into a more streamlined (and perhaps automated) workflow.
We start by introducing the pipeline that we're going to build. In essence, it is a set of python scripts that take some data, do something with that data and save the output somewhere else. The first step to creating a minimal pipeline is writing a master shell script that sequentially runs all of these python scripts. We then use a Makefile to do the very same while explaining some of the advantages that come with it. Finally, we use Nextflow, a commonly used bioinformatics workflow tool, to wrap up our pipeline. If you feel adventurous, you can follow this tutorial on how to run setup an AWS environment for Nextflow and then run your pipeline on it.
The workflow we're going to wrap in a pipeline looks like this:
- Take a set of .fasta protein files
- Split each into peptides using a variable number of missed cleavages
- Count the number of cysteines in total as well as the number of peptides that contain a cysteine
- Generate an output report containing this information in a .tsv file
- Create an archive to share with colleagues

The first part of this tutorial is influenced by this post on how to create bioinformatics pipelines with Make. I won't go into as much depth to explain Makefiles themselves, so if this is the first time you're encountering a Makefile, I'd recommend going through the linked post first.
Setup
Go through the box below to install the needed tools. I tried to make the dependencies as small as possible.
Mac OS
# Add project to your path for this session.
export PATH="$PATH:$(pwd)"

# Open the terminal; Install utilities for homebrew
xcode-select --install

# Install homebrew
/bin/bash -c "$(curl -fsSL https://raw.githubusercontent.com/Homebrew/install/HEAD/install.sh)"

# Install python3
Follow this tutorial: https://opensource.com/article/19/5/python-3-default-mac

# Install make
brew install make

# Install git
brew install git

# Install matplotlib
pip3 install matplotlib

# Install Nextflow (https://www.nextflow.io/docs/latest/getstarted.html)
wget -qO- https://get.nextflow.io | bash
chmod +x nextflow
## Move Nextflow to a directory in your $PATH such as /usr/local/bin
mv nextflow /usr/local/bin/
Linux
# Install python3, git and make
sudo apt-get update
sudo apt-get install python3 git make

# Install matplotlib
sudo apt-get install python3-matplotlib

# Install Nextflow (https://www.nextflow.io/docs/latest/getstarted.html)
wget -qO- https://get.nextflow.io | bash
chmod +x nextflow
## Move Nextflow to a directory in your $PATH such as /usr/local/bin
mv nextflow /usr/local/bin/
Introduction
In this section, we'll go through the basic intuition of what a pipeline is and why we need one. To walk through this from the ground up I chose a basic example. We have a bunch of proteins in .fasta files and want to create a report of how many cysteines each contains after it has been digested into peptides.
I created a Github repository which we'll be working with. To start off, fork it, clone it locally, and check out the branch part_00.
# Fork and clone repository and switch to branch part_1
git clone https://github.com/<your_git_username>/bioinformatics-pipeline-tutorial.git
cd bioinformatics-pipeline-tutorial/
git checkout part_00
Open the project in your favorite code editor to check out the directory structure. We have two folders: bin/ contains the python scripts we'll use throughout this tutorial to transform our files and fasta/ contains a set of protein .fasta files that we'll use (I went with the four Yamanaka factors but feel free to drop in whatever your favorite protein is).
Make all the scripts in bin executable by running the following command:
chmod +x bin/01_digest_protein.py bin/02_count_amino_acids.py bin/03a_plot_count.py bin/03b_get_report.pyLet's walk through the steps manually using KLF4 as our protein. First, we need to digest our protein into peptides. This is what the prepared script 01_digest_protein.py does. Feel free to open up the file and check it out. The required flags for the script are an input .fasta file and an output file path. The optional flags have default values but feel free to play around with them. For example, we can change the number of missed cleavages by appending --missed_cleavages=1 to our command. To digest our protein, run:
mkdir data/
bin/01_digest_protein.py fasta/KLF4.fasta data/KLF4.peptides.txt
We now have the file KLF4.txt in the data/ directory which should contain all the peptides of KLF4 after it was digested with trypsin (you can change the digestion enzyme by passing the --enzyme_regex flag).
Next up, we want to count the total # of amino acids in KLF4, the # of cysteines, the # of peptides and how many of them contain a cysteine. To do this, we run:
bin/02_count_amino_acids.py fasta/KLF4.fasta data/KLF4.peptides.txt data/KLF4.count.tsvWe can use the --amino_acid to change the amino acid to count (defaults to cysteine == C).
We're halfway there. Now we want to a) plot each output count file as a bar plot (see below) and b) create an output report summarizing the counts for multiple proteins.
To get the output plot we run:
# Just show
bin/03a_plot_count.py data/KLF4.count.tsv show

# Save fig
bin/03a_plot_count.py data/KLF4.count.tsv data/KLF4.plot.png
Now we run all the same steps for MYC and generate an output report for the two proteins.
# Digest
bin/01_digest_protein.py fasta/MYC.fasta data/MYC.peptides.txt

# Count
bin/02_count_amino_acids.py fasta/MYC.fasta data/MYC.peptides.txt data/MYC.count.tsv

# Plot
bin/03a_plot_count.py data/MYC.count.tsv data/MYC.plot.png

# Generate Report for KLF4 and MYC
bin/03b_get_report.py data/KLF4.count.tsv data/MYC.count.tsv --output_file=data/protein_report.tsv
Lastly, create an archive of the resulting output files.
# Create a results/ folder and archive it for sharing
mkdir results
cp data/*plot.png data/protein_report.tsv results/
tar -czf data/results.tgz results
rm -r results
Together these scripts implement a common workflow:
- Digest protein(s)
- Count occurrences of amino acid in protein(s)
- Plot results
- Generate a report with the results
- Archive the plots and report
Instead of running each of the commands manually, as above, we can create a master script that runs the whole pipeline from start to finish. Our run_pipeline.sh looks like this:
#!/usr/bin/env bash
# USAGE: bash run_pipeline.sh

mkdir -p data

# 01. Digest
bin/01_digest_protein.py fasta/KLF4.fasta data/KLF4.peptides.txt
bin/01_digest_protein.py fasta/MYC.fasta data/MYC.peptides.txt
bin/01_digest_protein.py fasta/PO5F1.fasta data/PO5F1.peptides.txt
bin/01_digest_protein.py fasta/SOX2.fasta data/SOX2.peptides.txt

# 02. Count
bin/02_count_amino_acids.py fasta/KLF4.fasta data/KLF4.peptides.txt data/KLF4.count.tsv
bin/02_count_amino_acids.py fasta/MYC.fasta data/MYC.peptides.txt data/MYC.count.tsv
bin/02_count_amino_acids.py fasta/PO5F1.fasta data/PO5F1.peptides.txt data/PO5F1.count.tsv
bin/02_count_amino_acids.py fasta/SOX2.fasta data/SOX2.peptides.txt data/SOX2.count.tsv

# 03a. Plot
bin/03a_plot_count.py data/KLF4.count.tsv data/KLF4.plot.png
bin/03a_plot_count.py data/MYC.count.tsv data/MYC.plot.png
bin/03a_plot_count.py data/PO5F1.count.tsv data/PO5F1.plot.png
bin/03a_plot_count.py data/SOX2.count.tsv data/SOX2.plot.png

# 03b. Generate Report
bin/03b_get_report.py data/KLF4.count.tsv \
					  data/MYC.count.tsv \
					  data/PO5F1.count.tsv \
					  data/SOX2.count.tsv \
					  --output_file=data/protein_report.tsv

# 04. Archive the results in a tarball so we can share them with a colleague
rm -rf results
mkdir results
cp data/*plot.png data/protein_report.tsv results/
tar -czf data/results.tgz results
rm -r results
Now we have a reproducible pipeline that we can easily run by calling:
bash run_pipeline.shWe can also share it with colleagues and we have some security that it will behave in the exact same manner when we rerun it (and don't have to worry about typos when using the command line manually).
If you're following along using your own GitHub repository, this is a good time to take a step back and commit your results.
git init
git add .
git commit -m "Finished setup"
git push
Let's also clean up the data folder for now, as we'll regenerate the files again in the next step:
rm data/*Makefile
Now, let's say we wanted to use pie charts instead of bar plots. We could just go into 03a_plot_count.py and change plt.bar to plt.pie , right?
Sure, but then we'd have to rerun the entire script even though the first part didn't change at all. Even so, this wouldn't be a big deal because we only have four files but imagine we were running this for the whole human .fasta file or our files were just much bigger. Alas, our current pipeline is not ideal.
As I mentioned, this post gives a much deeper overview of how to create Makefiles for bioinformatics workflows. I'm only covering the basics needed for our little tutorial here. There's also a great cheat sheet here if you get stuck on some commands.
Source: http://byronjsmith.com/make-bml/
Let's start by creating a Makefile and porting our first step into it.
touch MakefileUse the text editor of your choice to add to the Makefile. The simplest possible Makefile recipe is this:
targets: prerequisites
	command
We want to create the file KLF4.peptides.txt in the data/ folder (the target) using the bin/01_digest_protein.py script (the command), as before. Our input file is fasta/KLF4.fasta (the prerequisite). The result looks like this:
data/KLF4.peptides.txt: fasta/KLF4.fasta
	bin/01_digest_protein.py fasta/KLF4.fasta data/KLF4.peptides.txt
The targets are what we create as a result of executing the commands. Now, run:
make data/KLF4.peptides.txtOnce we've executed this, you should have generated the KLF4.peptides.txt file in the data/ folder. Make will only allow rerunning the command if the prerequisites have been modified since the target was created.
Try running make data/KLF4.peptides.txt again. You should get the following message, telling you that the prerequisites have not changed and therefore the target won't be different if you run it again:
$ make data/KLF4.peptides.txt
make: 'data/KLF4.peptides.txt' is up to date.
We can go around this by just changing the modification time of fasta/KLF4.fasta and restore the original behavior.
touch fasta/KLF4.fasta
make data/KLF4.peptides.txt
Let's add the second step, the counting step. As a reminder: we want to create the file KLF4.count.tsv in the data/ folder (the target) using the bin/02_count_amino_acids.py script (the command). Our input files are fasta/KLF4.fasta and data/KLF4.peptides.txt (the prerequisites). The resulting Makefile looks like this:
data/KLF4.peptides.txt: fasta/KLF4.fasta
	bin/01_digest_protein.py fasta/KLF4.fasta data/KLF4.peptides.txt

data/KLF4.count.tsv: fasta/KLF4.fasta data/KLF4.peptides.txt
	bin/02_count_amino_acids.py fasta/KLF4.fasta data/KLF4.peptides.txt data/KLF4.count.tsv
Now, try to add the plotting command (creates the file data/KLF4.plot.png) and the report (data/protein_report.tsv) yourself.
Here is the solution.
data/KLF4.peptides.txt: fasta/KLF4.fasta
	bin/01_digest_protein.py fasta/KLF4.fasta data/KLF4.peptides.txt

data/KLF4.count.tsv: fasta/KLF4.fasta data/KLF4.peptides.txt
	bin/02_count_amino_acids.py fasta/KLF4.fasta data/KLF4.peptides.txt data/KLF4.count.tsv

data/KLF4.plot.png: data/KLF4.count.tsv
	bin/03a_plot_count.py data/KLF4.count.tsv data/KLF4.plot.png

data/protein_report.tsv: data/KLF4.count.tsv
	bin/03b_get_report.py data/KLF4.count.tsv --output_file=data/protein_report.tsv

data/results.tgz: data/KLF4.plot.png data/protein_report.tsv
	rm -rf results
	mkdir results
	cp data/KLF4.plot.png data/protein_report.tsv results/
	tar -czf data/results.tgz results
	rm -r results
Let's remove all the files from the data/ subdirectory and run Make.
rm data/*
make data/results.tgz
You'll notice that Make executes every single command in the Makefile.
$ make data/result.tgz
bin/01_digest_protein.py fasta/KLF4.fasta data/KLF4.peptides.txt
bin/02_count_amino_acids.py fasta/KLF4.fasta data/KLF4.peptides.txt data/KLF4.count.tsv
bin/03a_plot_count.py data/KLF4.count.tsv data/KLF4.plot.png
bin/03b_get_report.py data/KLF4.count.tsv --output_file=data/protein_report.tsv
rm -rf results
mkdir results
cp data/KLF4.plot.png data/protein_report.tsv results/
tar -czf data/results.tgz results
rm -r results
Why is that? Makefiles work in a pull-based fashion. This means that the workflow is invoked by asking for a specific output file, whereafter all tasks required for reproducing the file will be executed. We can visualize this by looking at the dependency graph. To generate it we're using makefile2graph and call:
make -Bnd data/results.tgz | make2graph | dot -Tpng -o out.pngWe call make with our target data/results.tgz and in order to create it, we first need to create data/KLF4.plot.png and data/protein_report.tsv which in turn need data/KLF4.count.tsv and so on. That's why it generates all files at once.
In order to just see what files will be created, we can run use the flag --dry-run or its short form -n.
$ make --dry-run data/result.tgz
bin/01_digest_protein.py fasta/KLF4.fasta data/KLF4.peptides.txt
bin/02_count_amino_acids.py fasta/KLF4.fasta data/KLF4.peptides.txt data/KLF4.count.tsv
bin/03a_plot_count.py data/KLF4.count.tsv data/KLF4.plot.png
bin/03b_get_report.py data/KLF4.count.tsv --output_file=data/protein_report.tsv
rm -rf results
mkdir results
cp data/KLF4.plot.png data/protein_report.tsv results/
tar -czf data/results.tgz results
rm -r results
We can put an all target at the very top of our Makefile which is good practice as the topmost recipe is the one that is built by default when calling just make. Add the following to the top of your Makefile:
all: data/results.tgz

[...]
Another common target is clean:. Let's add the following below the all: target in our Makefile:
clean:
	rm -rf data/*
We can now create all our files by calling make all and clean the data/ folder by calling make clean.
We have to tell Make that all: and clean: will always refer to the targets in our Makefile and never to any files themselves, therefore we also add this to our Makefile:
.PHONY: all cleanOur Makefile should now look like this:
# Dummy targets
all: data/results.tgz

clean:
	rm -rf data/*

.PHONY: all clean

# Analysis and plotting
data/KLF4.peptides.txt: fasta/KLF4.fasta
	bin/01_digest_protein.py fasta/KLF4.fasta data/KLF4.peptides.txt

data/KLF4.count.tsv: fasta/KLF4.fasta data/KLF4.peptides.txt
	bin/02_count_amino_acids.py fasta/KLF4.fasta data/KLF4.peptides.txt data/KLF4.count.tsv

data/KLF4.plot.png: data/KLF4.count.tsv
	bin/03a_plot_count.py data/KLF4.count.tsv data/KLF4.plot.png

data/protein_report.tsv: data/KLF4.count.tsv
	bin/03b_get_report.py data/KLF4.count.tsv --output_file=data/protein_report.tsv

data/results.tgz: data/KLF4.plot.png data/protein_report.tsv
	rm -rf results
	mkdir results
	cp data/KLF4.plot.png data/protein_report.tsv results/
	tar -czf data/results.tgz results
	rm -r results
You might have noticed that there is a fair amount of repetition in each of the recipes. Let's take the first one and simplify it:
data/KLF4.peptides.txt: fasta/KLF4.fasta
	bin/01_digest_protein.py fasta/KLF4.fasta data/KLF4.peptides.txt
In Makefiles, the two variables $^ and $@ refer to the prerequisite and target of a rule so we can rewrite the above as:
data/KLF4.peptides.txt: fasta/KLF4.fasta
	bin/01_digest_protein.py $^ $@
In fact, to make sure that our python script is also considered as a prerequisite and the recipe is rerun when our script is updated we change it like this:
data/KLF4.peptides.txt: bin/01_digest_protein.py fasta/KLF4.fasta
	$^ $@
After applying these transformations, our Makefile should look like this:
# Dummy targets
all: data/results.tgz

clean:
	rm -rf data/*

.PHONY: all clean

# Analysis and plotting
data/KLF4.peptides.txt: bin/01_digest_protein.py fasta/KLF4.fasta
	$^ $@

data/KLF4.count.tsv: bin/02_count_amino_acids.py fasta/KLF4.fasta data/KLF4.peptides.txt
	$^ $@

data/KLF4.plot.png: bin/03a_plot_count.py data/KLF4.count.tsv
	$^ $@

data/protein_report.tsv: bin/03b_get_report.py data/KLF4.count.tsv
	$^ --output_file=$@

# Archive for sharing
data/results.tgz: data/KLF4.plot.png data/protein_report.tsv
	rm -rf results
	mkdir results
	cp $^ results/
	tar -czf $@ results
	rm -r results
Now the current Makefile only creates the KLF4 protein files. Let's add the other proteins, starting with MYC.
# Analysis and plotting
data/KLF4.peptides.txt: bin/01_digest_protein.py fasta/KLF4.fasta
	$^ $@

data/MYC.peptides.txt: bin/01_digest_protein.py fasta/MYC.fasta
	$^ $@
As you probably noticed, that would be a lot of repetition. We can pattern rules to abstract the individual protein names away:
# Analysis and plotting
data/%.peptides.txt: bin/01_digest_protein.py fasta/%.fasta
	$^ $@
If we would've gone ahead and blindly applied this to the last two rules we would've gotten the following error:
make: *** No rule to make target `data/%.count.tsv', needed by `data/%.plot.png'. Stop.Why is that? Remember how Makefiles use a “pull-based” scheduling strategy?
If we were to use the wildcards % everywhere, we'd never actually tell the Makefile what the wildcard stands for.
At some point, we need to define some target files that Make can use as a basis to fill in the wildcards for the others.
We insert two variables at the top and use them for the last two rules. Voilà.
COUNT := data/KLF4.count.tsv data/MYC.count.tsv \
			data/PO5F1.count.tsv data/SOX2.count.tsv
PLOT := data/KLF4.plot.png data/MYC.plot.png \
			data/PO5F1.plot.png data/SOX2.plot.png

[...]

data/protein_report.tsv: bin/03b_get_report.py ${COUNT}
	$^ --output_file=$@

# Archive for sharing
data/results.tgz: ${PLOT} data/protein_report.tsv
	rm -rf results
	mkdir results
	cp $^ results/
	tar -czf $@ results
	rm -r results
Now we're back on track. Let's run it:
makeYou might have noticed that the pipeline took a little bit longer to process the four proteins because it ran everything sequentially. You can use the --jobs or -j flag to run Make in parallel. That'll give us a nice speedup.
Let's check out the dependency graph at this point.
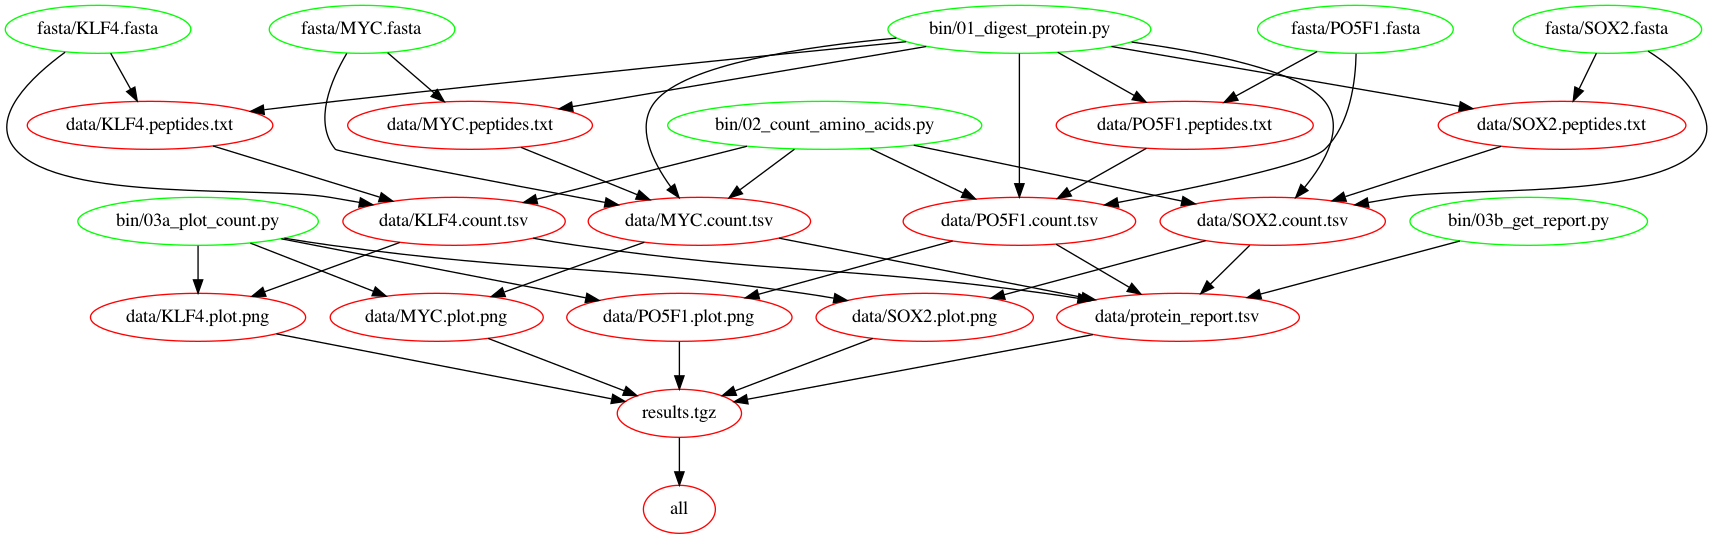
Your final Makefile should look like this:
COUNT := data/KLF4.count.tsv data/MYC.count.tsv \
			data/PO5F1.count.tsv data/SOX2.count.tsv
PLOT := data/KLF4.plot.png data/MYC.plot.png \
			data/PO5F1.plot.png data/SOX2.plot.png

# Dummy targets
all: data/results.tgz

clean:
	rm -rf data/*

.PHONY: all clean

# Analysis and plotting
data/%.peptides.txt: bin/01_digest_protein.py fasta/%.fasta
	$^ $@

data/%.count.tsv: bin/02_count_amino_acids.py fasta/%.fasta data/%.peptides.txt
	$^ $@

data/%.plot.png: bin/03a_plot_count.py data/%.count.tsv
	$^ $@

data/protein_report.tsv: bin/03b_get_report.py ${COUNT}
	$^ --output_file=$@

# Archive for sharing
data/results.tgz: ${PLOT} data/protein_report.tsv
	rm -rf results
	mkdir results
	cp $^ results/
	tar -czf $@ results
	rm -r results
Nextflow
We're now going to switch gears and turn to Nextflow. Makefiles are awesome but they're limited. For larger scale pipelines, the biggest limit is that we can't easily scale them horizontally. It'd have to be on the same machine. A lot of the steps we've implemented earlier though could easily run on multiple machines in parallel. Let's see how Nextflow helps with that. There are many tools like Nextflow, including but not limited to Airflow, Reflow, Snakemake, etc. They all have their advantages and disadvantages but I chose Nextflow for this tutorial (and for our work at talus.bio) because of its flexibility and popularity in the Bioinformatics community.
Start by creating a file main.nf which is a commonly used name for Nextflow files. We add only the digestProtein step, for now, to keep it simple.
#!/usr/bin/env nextflow

// Run workflow for all .fasta files in the fasta directory
fasta = Channel.fromPath("$baseDir/fasta/*.fasta")


// Helper function to extract the protein name from the filename
def getProtein(fileName) {
  fileName.getBaseName().tokenize(".")[0]
}


// Digest a protein and save the peptides
process digestProtein {
  input:
    path input_fasta from fasta

  output:
    path "*.txt" into peptides

  script:
    def protein = getProtein(input_fasta)
    """
    01_digest_protein.py ${input_fasta} ${protein}.peptides.txt
    """
}

peptides.view()
We also create a small nextflow.config file that includes only the publishDir directive for now. Nextflow does all the work in the work folder and if we want our processes to export data to a different location we have to specify that with the publishDir directive. Here we use our data/ folder again.
process {
	publishDir = [path: "data/", mode: "copy"]
}
One of the main functional differences between Nextflow and Makefiles is that Makefiles are pull-based but Nextflow is push-based. With the Makefiles, we had to specify the output files we want to generate and it automatically figured out which parts it had to execute to generate them. Here we take all the .fasta files from our fasta folder and "push" them into the pipeline.
Nextflow uses the groovy programming language which is based on Java. This makes it a lot more flexible than using bash. There are two main concepts: Processes and Channels. Processes are similar to the rules in a Makefile. We specify input and output as well as a script that determines how to generate the output from the input.
Run the pipeline with nextflow run main.nf and you'll see that it runs the process digestProtein four times (once for each fasta).
We'll now add the other functions step by step. When adding the countAA process we notice that it also takes the fasta Channel as an input. Let's try to run it without changing anything.
#!/usr/bin/env nextflow

// Run workflow for all .fasta files in the fasta directory
fasta = Channel.fromPath("$baseDir/fasta/*.fasta")


// Helper function to extract the protein name from the filename
def getProtein(fileName) {
  fileName.getBaseName().tokenize(".")[0]
}


// Digest a protein and save the peptides
process digestProtein {
  input:
    path input_fasta from fasta

  output:
    path "*.txt" into peptides

  script:
    def protein = getProtein(input_fasta)
    """
    01_digest_protein.py ${input_fasta} ${protein}.peptides.txt
    """
}


// Count the number of times a given amino acid appears in a protein as well
// as its peptides after digestion
process countAA {
  input:
    path input_peptides from peptides
    path input_fasta from fasta

  output:
    path "*.tsv" into aa_count

  script:
    def protein = getProtein(input_peptides)
    """
    02_count_amino_acids.py ${input_fasta} ${input_peptides} ${protein}.count.tsv
    """
}
You should've gotten the following error:
$ nextflow run main.nf
N E X T F L O W  ~  version 21.09.0-edge
Launching `main.nf` [clever_solvay] - revision: 84edb4b9a9
Channel `fasta` has been used twice as an input by process `countAA` and process `digestProtein`

 -- Check script 'main.nf' at line: 31 or see '.nextflow.log' file for more details
[-        ] process > digestProtein -
To avoid this error we split our fasta channel into two.
[...]

// Run workflow for all .fasta files in the fasta directory
fasta = Channel.fromPath("$baseDir/fasta/*.fasta")
fasta.into {
  fasta_a
  fasta_b
}

[...]

process digestProtein {
  input:
    path input_fasta from fasta_a
[...]

process countAA {
  input:
    path input_peptides from peptides
    path input_fasta from fasta_b
[...]
We also know that the output from countAA goes into both plotCount and generateReport so we use the same trick as with the fasta channel. Our main.nf file should now look like this. Note that we used .collect() both in generateReport and archiveResults. By default, Nextflow would've run these processes once for each item. In this case, we deliberately want to avoid that behavior, because our processes use all files at once.
#!/usr/bin/env nextflow

// Run workflow for all .fasta files in the fasta directory
fasta = Channel.fromPath("$baseDir/fasta/*.fasta")
fasta.into {
  fasta_a
  fasta_b
}


// Helper function to extract the protein name from the filename
def getProtein(fileName) {
  fileName.getBaseName().tokenize(".")[0]
}


// Digest a protein and save the peptides
process digestProtein {
  input:
    path input_fasta from fasta_a

  output:
    path "*.txt" into peptides

  script:
    def protein = getProtein(input_fasta)
    """
    01_digest_protein.py ${input_fasta} ${protein}.peptides.txt
    """
}


// Count the number of times a given amino acid appears in a protein as well
// as its peptides after digestion
process countAA {
  input:
    path input_peptides from peptides
    path input_fasta from fasta_b

  output:
    path "*.tsv" into aa_count_a, aa_count_b

  script:
    def protein = getProtein(input_peptides)
    """
    02_count_amino_acids.py ${input_fasta} ${input_peptides} ${protein}.count.tsv
    """
}


// Load the calculated counts and create a plot
process plotCount {
  input:
    path input_count from aa_count_a

  output:
    path "*.png" into count_plot

  script:
    def protein = getProtein(input_count)
    """
    03a_plot_count.py ${input_count} ${protein}.plot.png
    """
}


// Get a list of input files from a given folder and create a report
process generateReport {
  input:
    path input_count from aa_count_b.collect()

  output:
    path "*.tsv" into protein_report

  script:
    """
    03b_get_report.py ${input_count} --output_file=protein_report.tsv
    """
}


// Gather result files and archive them
process archiveResults {
  input:
    path input_plot from count_plot.collect()
    path input_report from protein_report

  output:
    path "*.tgz" into archive_results

  script:
    """
    mkdir results
    cp ${input_plot} ${input_report} results/
    tar -czf results.tgz results
    """
}
So far we've been the "old" way of writing pipelines in Nextflow. I wrote the pipeline this way on purpose, in order to showcase the difference between push-based and pull-based. It's still a legitimate way of writing them but Nextflow has recently released a new DSL (Version 2) which makes the whole process more flexible and IMO a bit more elegant. Instead of having to think about how to connect processes, we treat them more like functions that take an input and output and connect them via a workflow block. Let's see what that would look like. Rename the main.nf to main_old.nf and copy its content into a new main.nf.
cp main.nf main_old.nfWe start by enabling the new DSL at the top of our file.
#!/usr/bin/env nextflow
nextflow.enable.dsl = 2

[...]
Then we remove all the from and into directives from our processes and add the following workflow block at the bottom.
[...]

workflow {
  // Run workflow for all .fasta files in the fasta directory
  fasta = Channel.fromPath("$baseDir/fasta/*.fasta")
  peptides = digestProtein(fasta)
  aa_count = countAA(peptides, fasta)
  count_plot = plotCount(aa_count)
  protein_report = generateReport(aa_count | collect)
  archive_results = archiveResults(count_plot | collect, protein_report)
}
Last check, your main.nf should now look like this:
#!/usr/bin/env nextflow
nextflow.enable.dsl = 2


// Helper function to extract the protein name from the filename
def getProtein(fileName) {
  fileName.getBaseName().tokenize(".")[0]
}


// Digest a protein and save the peptides
process digestProtein {
  input:
    path input_fasta

  output:
    path "*.txt"

  script:
    def protein = getProtein(input_fasta)
    """
    01_digest_protein.py ${input_fasta} ${protein}.peptides.txt
    """
}


// Count the number of times a given amino acid appears in a protein as well
// as its peptides after digestion
process countAA {
  input:
    path input_peptides
    path input_fasta

  output:
    path "*.tsv"

  script:
    def protein = getProtein(input_peptides)
    """
    02_count_amino_acids.py ${input_fasta} ${input_peptides} ${protein}.count.tsv
    """
}


// Load the calculated counts and create a plot
process plotCount {
  input:
    path input_count

  output:
    path "*.png"

  script:
    def protein = getProtein(input_count)
    """
    03a_plot_count.py ${input_count} ${protein}.plot.png
    """
}


// Get a list of input files from a given folder and create a report
process generateReport {
  input:
    path input_count

  output:
    path "*.tsv"

  script:
    """
    03b_get_report.py ${input_count} --output_file=protein_report.tsv
    """
}


// Gather result files and archive them
process archiveResults {
  input:
    path input_plot
    path input_report

  output:
    path "*.tgz"

  script:
    """
    mkdir results
    cp ${input_plot} ${input_report} results/
    tar -czf results.tgz results
    """
}


workflow {
  // Run workflow for all .fasta files in the fasta directory
  fasta = Channel.fromPath("$baseDir/fasta/*.fasta")
  peptides = digestProtein(fasta)
  aa_count = countAA(peptides, fasta)
  count_plot = plotCount(aa_count)
  protein_report = generateReport(aa_count | collect)
  archive_results = archiveResults(count_plot | collect, protein_report)
}
Conclusion
That's a wrap! We created a fully functional pipeline from the bottom-up, covering shell scripts, Makefiles, Nexflow as well as the two main types of execution: push- and pull-based. We've seen the benefits that modern tools like Nextflow can have over more traditional approaches like scripts and Makefiles. Hopefully, this tutorial provided a solid baseline for what a pipeline is and how to write one from scratch (while climbing up the ladder of complexity).
For follow-up questions or feedback on this article, you can submit an issue through the accompanying GitHub repository or reach me on Twitter.
If you want to learn more about the concepts covered in this article check out these tutorials:
- Bioinformatics pipelines with Make: http://byronjsmith.com/make-bml/
- Bioinformatics pipelines with Nextflow: https://carpentries-incubator.github.io/workflows-nextflow/aio/index.html
If you're interested to explore some other tools check out these resources:
- A pretty extensive list of all existing pipeline tools: https://github.com/pditommaso/awesome-pipeline
- Nextflow vs Snakemake vs Reflow http://blog.booleanbiotech.com/nextflow-snakemake-reflow.html
- How to choose the right one: https://www.ncbi.nlm.nih.gov/pmc/articles/PMC7906312/
- This review is also interesting: https://academic.oup.com/bib/article/18/3/530/2562749
- And these comparison threads
Optional: Nextflow in the Cloud ☁️
If you have followed the tutorial I mentioned in the first paragraph and set up your AWS environment for Nextflow, there's one more thing to mention.
The biggest advantage of Nextflow over shell scripts or Mainfiles is its ability to easily scale into the cloud. To do that we don't need to change anything in the main.nf file itself. We need to
- Setup our AWS Environment
- Add another executor
The one we've been using implicitly so far looks like this (in the nextflow.config):
profiles {
	standard {
		process.executor = "local"
	}
}

[...]
We now add the Nextflow plugin for AWS as well as our region of choice and a role to operate with. We also add an executor for AWS Batch. You can either build the docker image I used from the Dockerfile in the repository or use the one I published called rmeinl/python-plt.
The nexflow.config file should then look like this:
// Profiles
profiles {
	standard {
		process.executor = "local"
	}
	cloud {
		process {
			executor = "awsbatch"
			queue = "terraform-nextflow-medium-size-spot-batch-job-queue"
			container = "rmeinl/python-plt:latest"
		}
		errorStrategy = "retry"
		maxRetries = 3
	}
}

// Process
process {
	publishDir = [path: "data/", mode: "copy"]
}

// Plugins
plugins {
    id "nf-amazon"
}

// AWS Setup
aws {
    region = "us-west-2"
    batch {
    	cliPath = "/home/ec2-user/bin/aws"
        jobRole = "arn:aws:iam::622568582929:role/terraform-nextflow-batch-job-role"
    }
}
In order to run this whole workflow in the cloud we call:
nextflow run main.nf -profile cloudYou should now see this message indicating success:
$ nextflow run main.nf -profile cloud
N E X T F L O W  ~  version 21.09.0-edge
Launching `main.nf` [dreamy_murdock] - revision: 7be483af55
Uploading local `bin` scripts folder to s3://terraform-nextflow-work-bucket/tmp/f4/43104ae6c68d4b50070806e54e391a/bin
executor >  awsbatch (14)
[90/eabf4a] process > digestProtein (3) [100%] 4 of 4 ✔
[77/fec491] process > countAA (4)       [100%] 4 of 4 ✔
[95/e4ea25] process > plotCount (4)     [100%] 4 of 4 ✔
[e4/a2dff2] process > generateReport    [100%] 1 of 1 ✔
[4a/01e553] process > archiveResults    [100%] 1 of 1 ✔
Completed at: 09-Dec-2021 19:36:18
Duration    : 4m 33s
CPU hours   : (a few seconds)
Succeeded   : 14